

Records in a space
A record is a structured row of data that lives inside a space. Examples: an extracted invoice, a patient intake, a contract’s key terms. Every record belongs to a record type. The record type defines the record’s fields.
Records show on a space’s Data tab. On that tab you can add records by hand and review the records that an action or the agent produced. You can also organize records with saved views.
Record types (the field definitions) are defined once at the org level. They are read-only from the Data tab. To create or change a record type, see Record types.
Open the Data tab
Open a space and select the Data tab. The heading reads Record types with the line “Structured records collected in this space.”
The tab lists only the record types that have records in this space. It shows them as a table with Name and Records (a count) columns. If the space holds no records yet, the tab shows “No records yet — Records added to this space show up here, grouped by type. Add one to get started.”
Two buttons sit in the header:
- Add record — pick a record type, then create a record of that type in this space.
- Manage record types — open the org-level record type definitions. They are read-only from here.

Add a record
Choose a type
Click Add record. A picker opens: “Add a record — Choose the type of record to add to this space.” If no types exist yet, the picker shows “No record types are defined yet. An admin can create them under Manage record types.”
You can also add the first record of a type from that type’s empty table: Add the first record.
The records table
Select a record type to open its records surface. A view toolbar sits on top (see Saved views). Below the toolbar, the records table shows:
- The type’s title field pinned to the left. This is the field configured as each record’s title.
- The columns that the current view makes visible.
- A per-column review dot on columns that an action or the agent wrote. The dot marks fields that still need review.
- A trailing Created column.
- Load more paging at the bottom.
The header carries a New record button. An empty table reads “No records yet — Add the first record to get started.”

Open a record
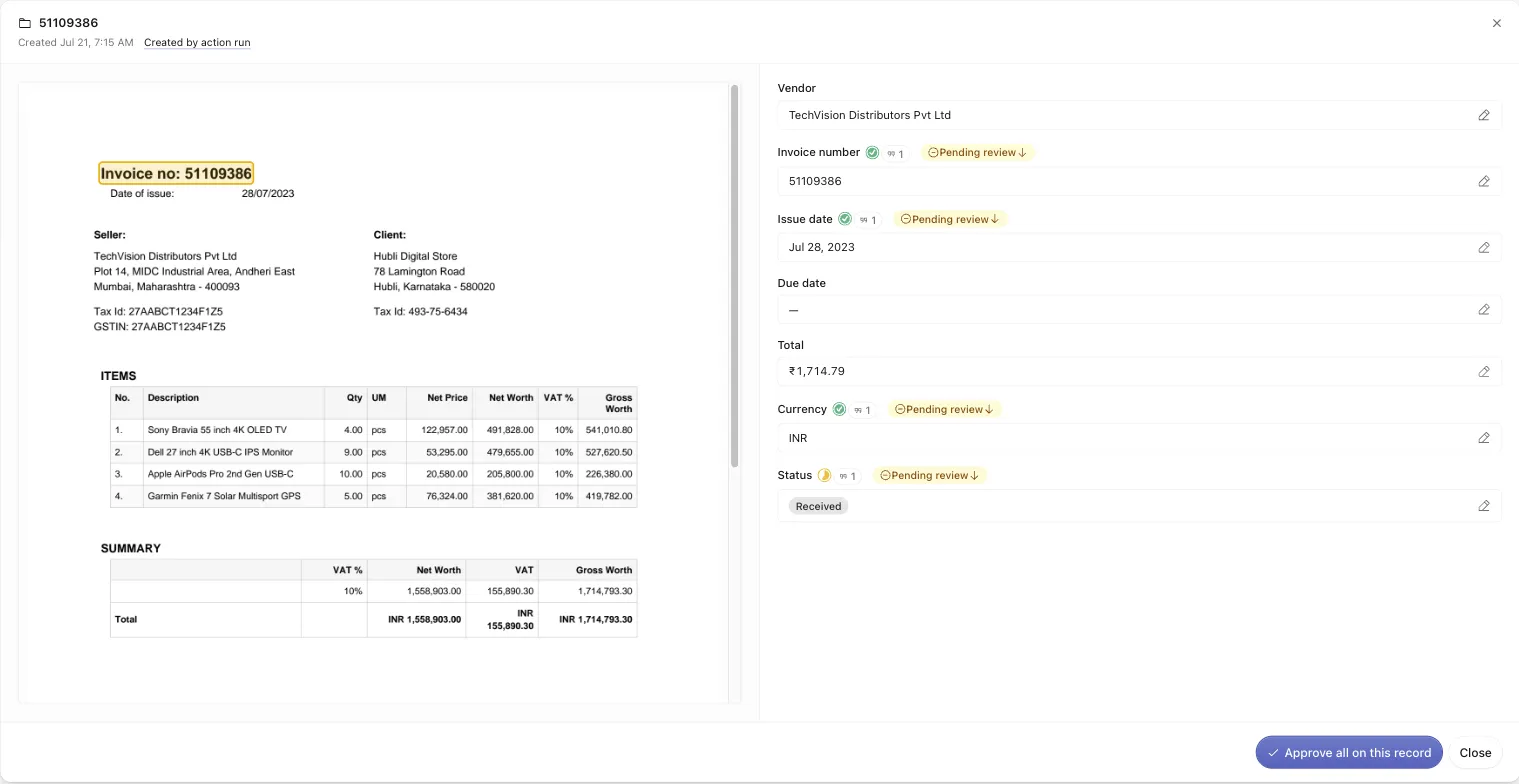
Click a row to open the record as a full-page, two-pane workspace.
- Records with cited AI-written fields (the extraction ran with grounding on) show the cited source document on the left and the fields on the right. Select a field’s citation to see it in context. The context is a bounding-box highlight on the PDF page, or a seek into the audio transcript. Before you select a citation, the pane reads “Select a field’s cited source to preview it here.”
- Records that you created by hand show the fields full-width, with no source pane.
The header shows the created and updated dates. When the record came from automation, the header also shows provenance links: Created by action run and From playbook run. Follow them to the action run or playbook run that produced the record.
Edit a field
Click a field to edit it inline, then Save (or Cancel). Optional fields also offer Clear to empty them.
Locked fields
A locked field shows a lock icon (“This field is locked”). A lock pins the field so an automated run does not overwrite it. Use a lock when you corrected a value by hand and the next extraction must not replace it. You do not have to unlock the field first. When you edit a locked field, the app auto-unlocks it as part of the same save.
Review and provenance
Fields that an action or the agent wrote carry a per-field review control. When the action that produced them had grounding enabled, they also carry source citations. Use the citations to check each value against its source. A citation chip on the field links back to the cited passage. Grounding is off unless you turn it on for the action. See Extract data.
- Approve all on this record — approve every AI-written field on the open record in one click. This button appears only on records that have AI-written fields.
- Column-level bulk review — from a column’s header, choose Review this column across N records. Then choose Approve this column, Reject this column, or Dismiss this column. This clears the review backlog for one field across every record at once.
Review status renders as a dot or badge on the cells.
When you edit an AI-written value, the app replaces it with your text and removes its source citation. The same trade-off applies when you edit in an extraction run’s review workspace.
Saved views
A view is a saved arrangement of columns, filters, and sorts over one record type. Use the view toolbar to switch and manage views.
- Default View always exists. You cannot rename or delete it.
- Create custom view — the new view starts from the current view’s columns, filters, and sorts. You can then change them. (“The new view starts from the current view’s columns, filters, and sorts.”)
- The toolbar also offers Copy link to view and Delete view.
Fields — choose the columns
The Fields panel toggles and reorders a view’s columns: “Toggle and drag to reorder the columns of this view.” It splits into visible fields and Hidden fields (N).
Filter — show only matching records
The Filter panel shows only records that match your conditions. Combine conditions with All conditions (AND) or Any condition (OR). Available operands: Is, Is not, Is empty, Is not empty, Contains, Does not contain, Greater than, Greater than or equal, Less than, Less than or equal, Is before, Is after, Is any of, Includes any of.
Sort — order the records
The Sort panel orders records by one or more fields. Each field sorts Ascending or Descending. The default is newest-first.
You need permission to edit a view’s columns, filters, or sorts. Without it, the panels are read-only.
Where records come from
Most records are not typed in by hand. They are imported from an extraction action. Configure an extraction to output a record type. When you approve its results, the app imports them into this Data tab as records, with citations and provenance. See Extract data for that flow.