

Actions and the library
An action is a reusable, single-purpose tool your team runs on documents. Examples: read a document and pull out structured data, fill a form, send a document for signature. You install an action once from the library and configure it. Then you run it over a space’s files, on its own or as a step the AI assistant dispatches inside a playbook.
To run an installed action, see Run an action.
Installed actions
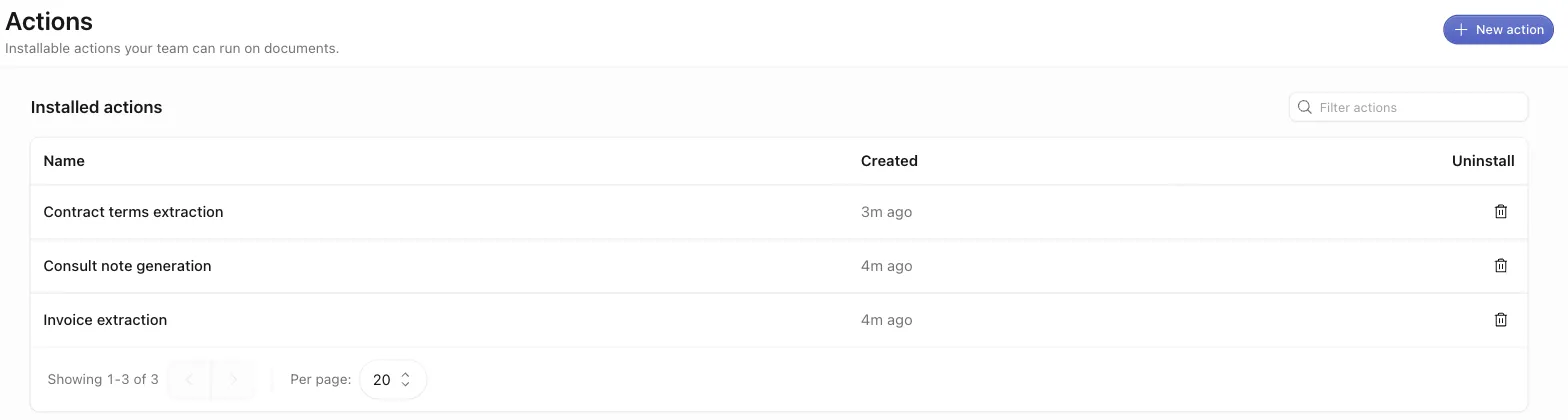
Open Actions in the sidebar to reach /actions, titled “Actions” with the description “Installable actions your team can run on documents.” The “Installed actions” section lists each action your team installed. Use the “Filter actions” box to narrow the list.
The table has these columns:
- Name — links to the action’s configuration editor.
- Created — when the action was installed.
- Uninstall — a trash button. It opens a confirm dialog titled “Uninstall action?” (“This removes “
{name}” from your organization. This can’t be undone.”). Confirm with “Uninstall”.
If nothing is installed, you see “No actions installed” / “Install an action from the library to get started.” The list is paginated (10, 20, 50, or 100 per page).
To install a new action, click “New action” in the top right. It opens the library.
Only admins can install actions. The “Action type”, “ID”, and “Slug” columns appear only in developer mode. Other users see Name, Created, and Uninstall. The ID and the slug identify the same installed action. Use either one where the API asks for one. The slug is per-organization and changes if you rename the action. The ID never changes.
The library
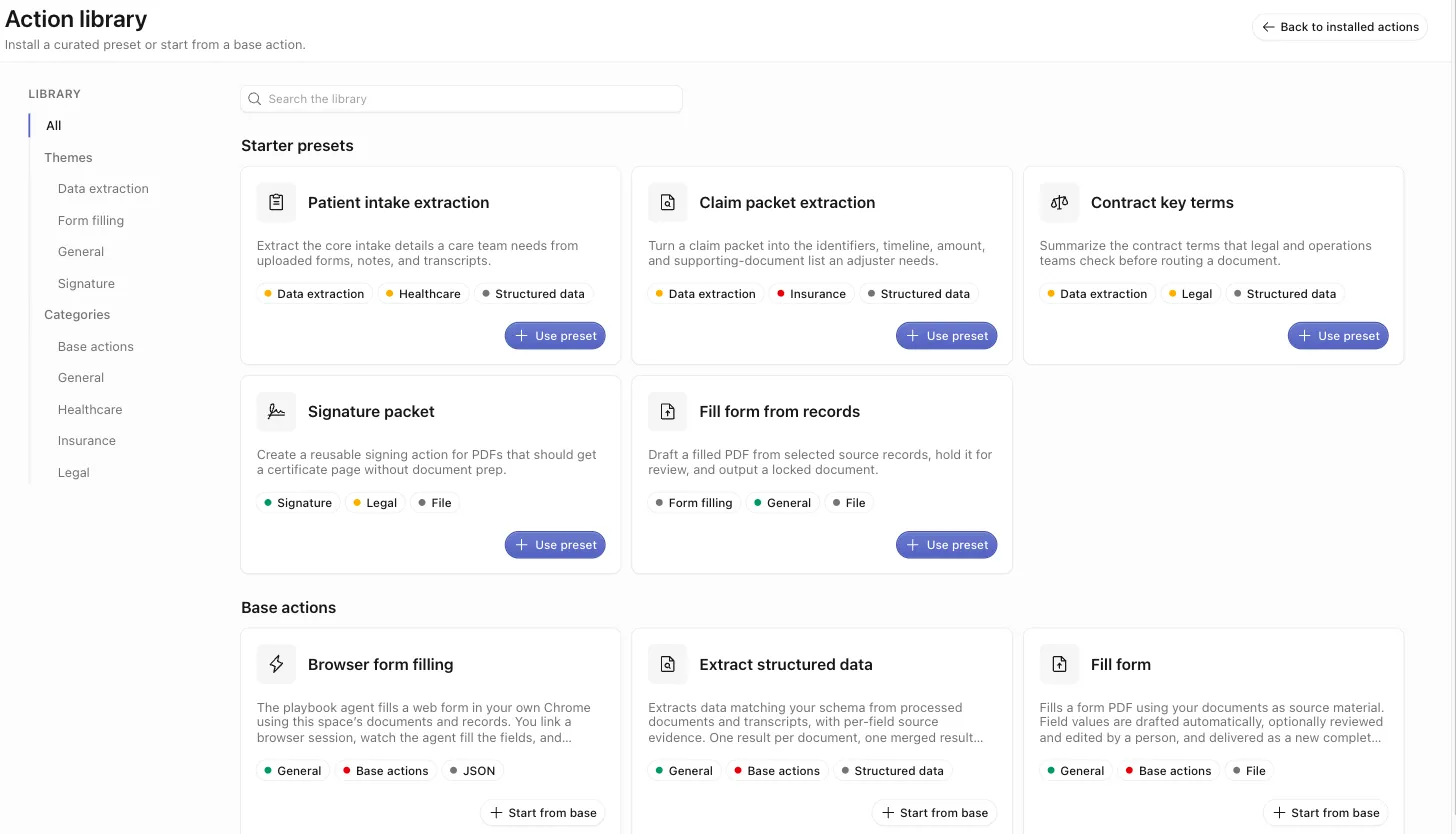
The library at /actions/library is titled “Action library” with the description “Install a curated preset or start from a base action.” A left-hand nav filters the catalog by “All”, “Themes”, and “Categories”. A “Search the library” box searches by name. “Back to installed actions” returns you to /actions.
Cards are grouped into two sections:
- Starter presets — curated, ready-to-use configurations for a common job. Example: extract the key terms from a contract. Each preset card has a “Use preset” button.
- Base actions — the plain, unconfigured version of each action, one per action type. Each base card has a “Start from base” button.
Every card shows an icon, a short description, and dot-badges for its theme, category, and output type. Click “Use preset” or “Start from base” to install the action for your organization immediately. The action’s configuration editor then opens. Install and configuration are not separate steps. If an install fails, you see “Couldn’t install this action.”
Configure an installed action
The configuration editor lives at /actions/$actionId. It has an editable “Name”, a “Configuration” section, and a right-rail “Details” card.
The action’s own definition generates the “Configuration” form. The help text reads “These settings are passed to the action each time it runs.” Fill in the typed controls (text boxes, switches, dropdowns, lists, pickers) and click “Save”. If an action takes no settings, you see “This action has no configuration.”
Some settings exist only as raw configuration. In that case, non-developers see “This action’s configuration can only be edited in developer mode.” Turn on developer mode to edit those settings.
The Output choice
Extract-style actions read documents and pull out structured fields. They add an “Output” control with two choices:
- Data object — bind the extraction to a record type. Approved results then import as records in the space’s Data tab.
- Schema only — the extracted data stays on the run. Nothing is imported into Data.
These actions also carry a grounding setting, off by default. Turn it on to get each extracted field with its source citations. You can then check each value against the document. See Extract data.
Focused Build entry points
Three sidebar destinations under Build are convenience views over the same installed actions. Each view filters to one action type and opens a tailored editor:
- Document understanding — your structured-extraction actions. See Extract data from documents.
- Document generation → Fill form and Document generation → Sign — your form-filling and e-signature actions. See Fill and sign documents.
Each of these lists has a “New configuration” button that seeds a fresh install of that type. They edit the same installed actions as /actions/$actionId.
First-party actions
CloudRaker ships six actions you can install from the library. Three have dedicated Build pages:
The other three actions are redact PDF, redact audio, and browser fill. They have no dedicated Build page or review UI. Install them from the library and run them like any other action. Collect their output under Generated files on the run page. See Run an action.
Developer mode
Developer mode is a toggle in the profile menu. When it is on, you also see:
- the Action type, ID, and Slug columns on the installed-actions list (ID and Slug render as copy-to-clipboard chips), and the catalog slug on library cards;
- a Form / JSON tab switch and a raw JSON editor in the configuration form;
- the Run details disclosure on the run page (see Run an action);
- a Manifest card on the configuration editor.
Developer mode changes only what you see in the app. To drive actions and runs from outside the app, see the Developers tab. It covers the API.